Installing a ceiling fan with a light and remote is a great way to improve your home’s comfort and utility. Whether you’re replacing an existing fixture or adding a new one, this guide will walk you through the entire process.
Getting Started
Before you start, it’s essential to gather all the necessary tools and materials. Here’s a list of what you’ll need:
- A ceiling fan with light and remote
- A ladder
- Wire cutters/strippers
- Circuit tester/voltage detector
- Adjustable wrench
- Pliers
- Screwdrivers
- Eye protection
- Work gloves
Remember, safety comes first. Always wear appropriate protective gear when handling electrical devices.
Preparing for Installation
Before starting the installation process, consider the following factors:
- Room Size: The size of the room determines the size of the fan you should install. Measure your room before shopping for a fan.
- Ceiling Height and Angle: Check the ceiling height and angle before installing a downrod. Ceilings with steep angles or a sloped ceiling will need a special downrod.
- Electrical Box: Ceiling fans need to be anchored to an electrical box designed to hold a heavy fixture. Make sure the electrical box is fan-rated and can support the weight of the fan.

Power Off
Before starting the installation, turn off the power at the circuit breaker and place any wall switches in the off position. You can place a piece of electrical tape across the switches to prevent anyone from turning the power back on while you are working.
Mounting the Junction Box
If you are replacing a ceiling fan, now is the time to disconnect the wires and remove the existing fan. If you are installing a new ceiling fan, you will need to install a new junction box. Make sure the junction box is securely attached to the building structure to support the ceiling fan.
Mounting the Bracket
Next, secure the mounting bracket to the junction box. Always follow the manufacturer’s instructions for this step. Thread the main wires through the center of the mounting bracket.
Setting the Downrod or Flush Mount
Depending on the model of your fan, you will either need to install a downrod or a flush mount. For a downrod installation, insert the downrod into the collar yoke on the fan motor and secure it to the motor assembly. For a flush mount installation, attach the top housing, trim ring, and canopy to the fan motor assembly.
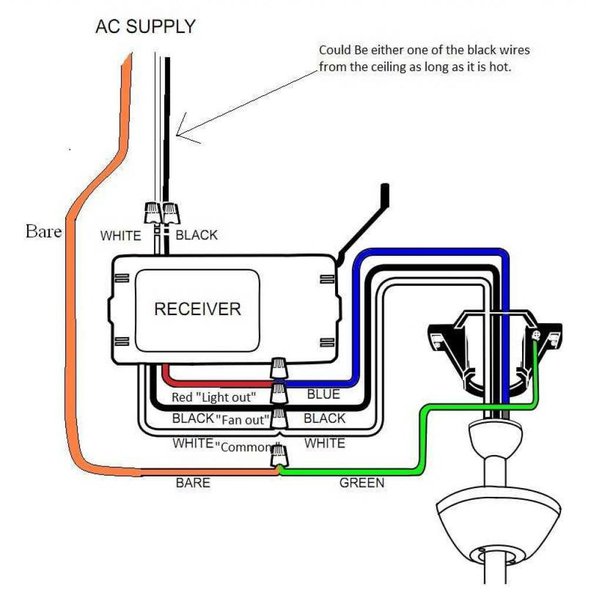
Wiring the Ceiling Fan
During this step, you will connect the fan wires to your household wiring. Some fans come with additional wires, so be sure to follow the owner’s manual for specific instructions. Use wire connectors to join the ceiling fan wiring according to the manufacturer’s instructions.
Attaching the Blades and Light Bulb
Using the included hardware, attach each blade bracket to a fan blade. Then attach each blade to the fan. Some fans have quick-install blades that can make the installation process faster. Once the blades are attached, you can install the light bulb.
Final Steps
After you have completed the installation, restore power to the outlet. Test the fan and light using the remote control to ensure everything is working correctly. If the fan or light does not work, you may need to check your wiring connections or consult with a professional.
Troubleshooting
If you encounter any issues during the installation process, here are some troubleshooting tips:
- If the LED indicator on the remote does not illuminate, the battery may need to be replaced.
- If the remote controls more than one fan, you may need to re-sync the remote.
- If the dimming feature does not function, ensure one of the buttons is not stuck in the down position.
Installing a ceiling fan with light and remote is a great DIY project that can improve the comfort and efficiency of your home. With the right tools and a bit of patience, you can complete this project in under two hours. Remember to always prioritize safety when working with electrical devices and consult with a professional if you encounter any issues.